
Github Pages로 블로그 만들기 3편 -설정하기
이제 hugo에서 사이트를 생성해 보자.
1. Github에 Repository 생성하기
우선 github에 두개의 repository를 생성해야 합니다.
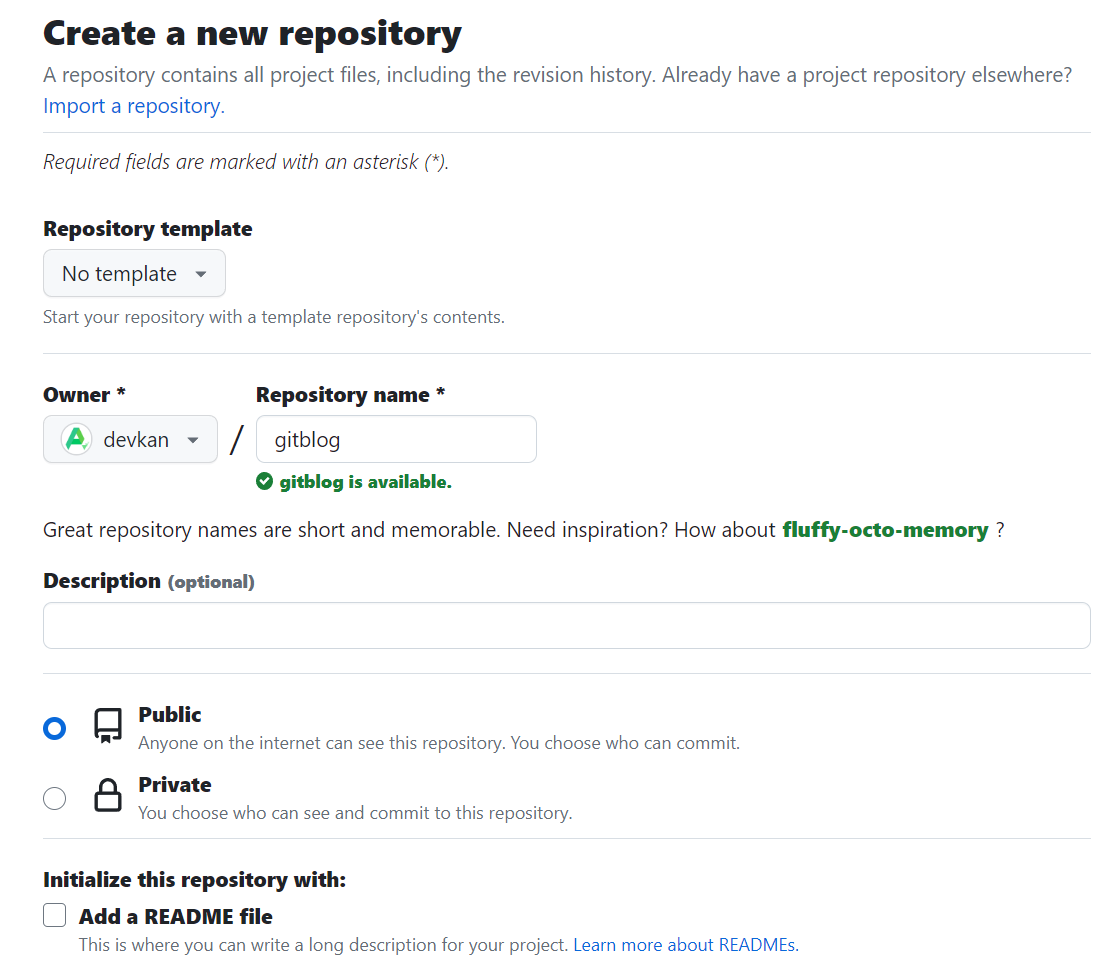
하나는 hugo에 의해 렌더링 되기 전의 소스를 저장하는 repository(여기서는 gitblog)이고,
이건 private으로 생성하셔야 합니다.
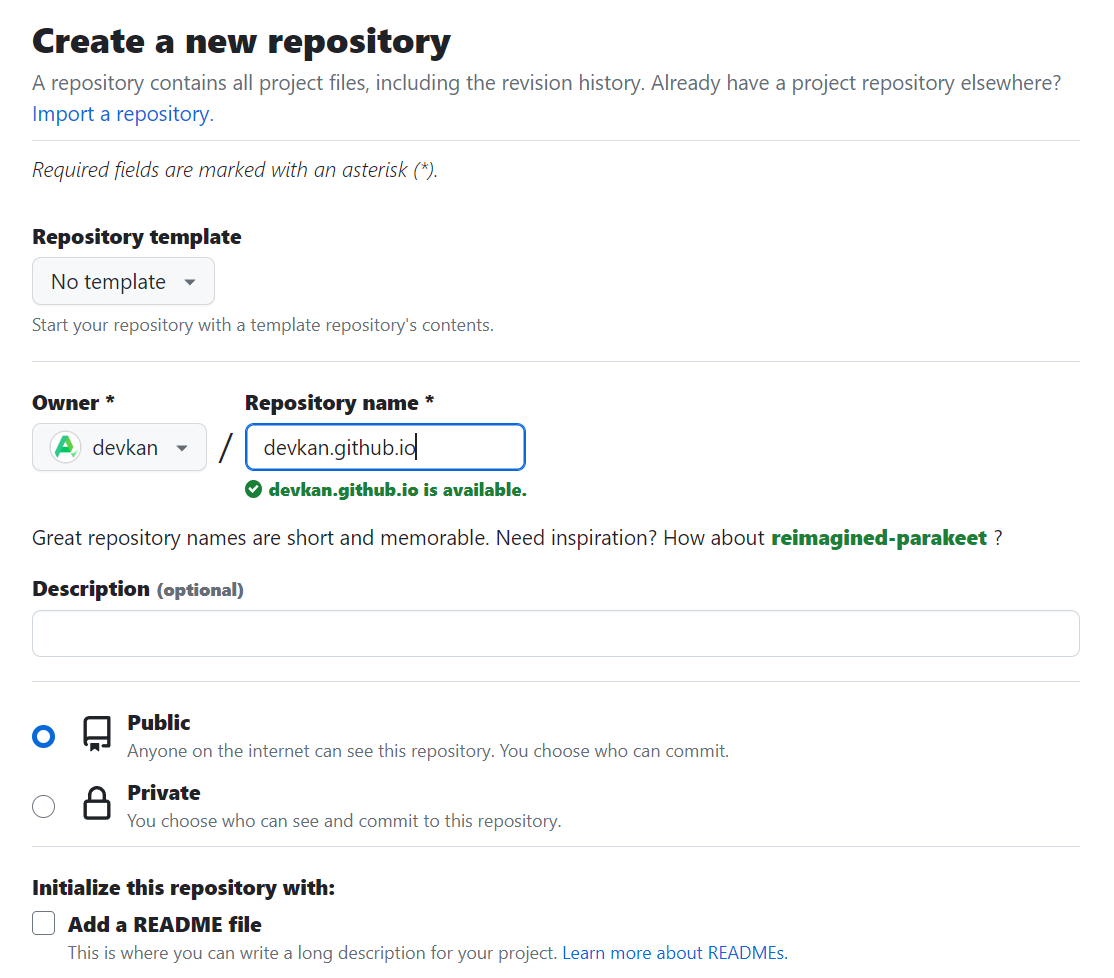
하나는 hugo에 의해 렌더링 된 후의 결과물을 저장하는 repository(여기서는 devkan.github.io)입니다.
다시 정리하면, vscode에서 컨텐츠를 생성하고, 이것을 hugo로 렌더링을 합니다.
그럼 hugo에서 테마나 템플릿을 이용해서 각각의 페이지를 만들어 냅니다.
(즉, 헤더/풋터/메뉴등을 알아서 붙여주고.. 필요한 카테고리/태그등도 만들고, 페이징도 별도 구성도 하고 합니다.)
그리 만들어진 결과물을 원본소스는 gitblog로 push하고, 렌더링된 컨텐츠는 devkan.github.io에 push를 하면,
github pages에서 보이게 되는겁니다.

github pages에 바로 적용은 안되고, 딜레이가 약간 있습니다.(약 1분정도)
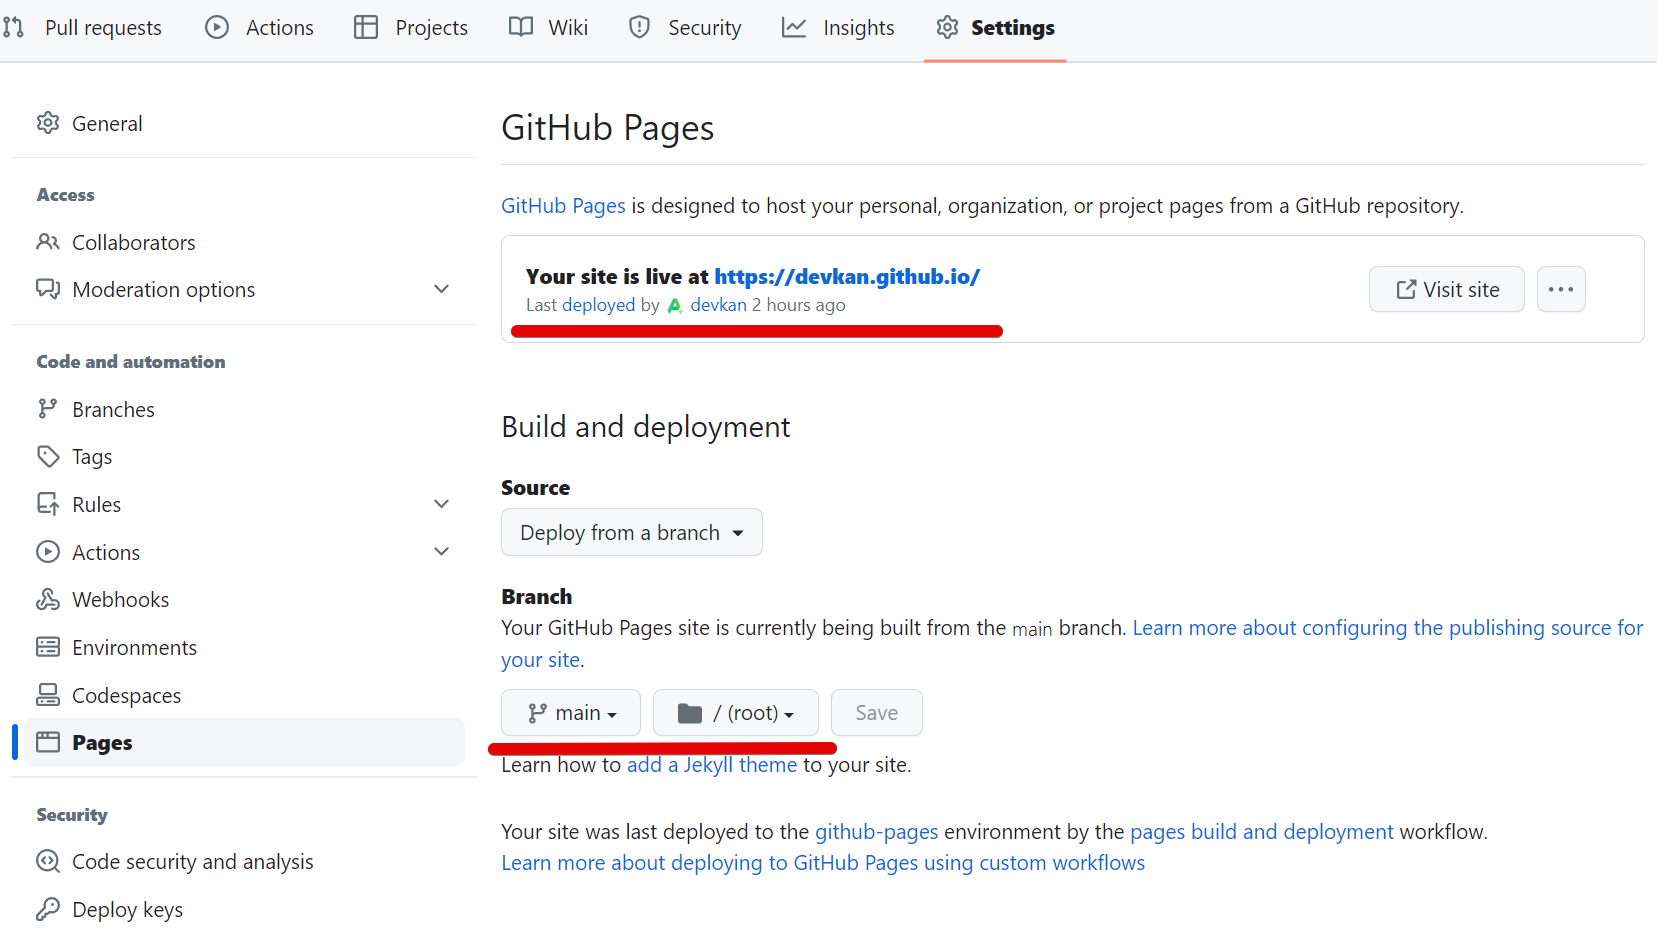
public으로 공개된 repository가 외부에서 접근이 가능한지 확인해 보고, 만일 안된다면 해당 레포지토리의 setting에서 pages로 들어가 도메인을 적어주면 됩니다.
(일반적으로 <username>.github.io 로 설정하면 됩니다.)
2. 테마 적용하기
테마는 https://themes.gohugo.io/ 에서 가져오면 됩니다.
원하는 테마를 찾은후, 저장소를 가져오면 됩니다.
형식은 git clone https://github.com/<theme 경로>.git themes/<theme 이름> 이렇게 하면 됩니다.
저는 mainroad를 사용했습니다.
> git clone https://github.com/vimux/mainroad.git themes/mainroad

# git submodule add https://github.com/<theme 경로>.git themes/<theme 이름>
# cp themes/hugo-tranquilpeak-theme/exampleSite/config.toml config.toml
그럼 테마가 themes 밑에 설치가 됩니다.
그리고 config.toml을 루트에 복사해 줍니다.
(이건 테마마다 다르니, 테마의 README.md를 참조하세요.)
> cp themes/mainroad/exampleSite/config.toml config.toml
이 설정 파일은 테마마다 틀리니, 테마의 README.md를 참조해 수정해 주셔야 합니다.
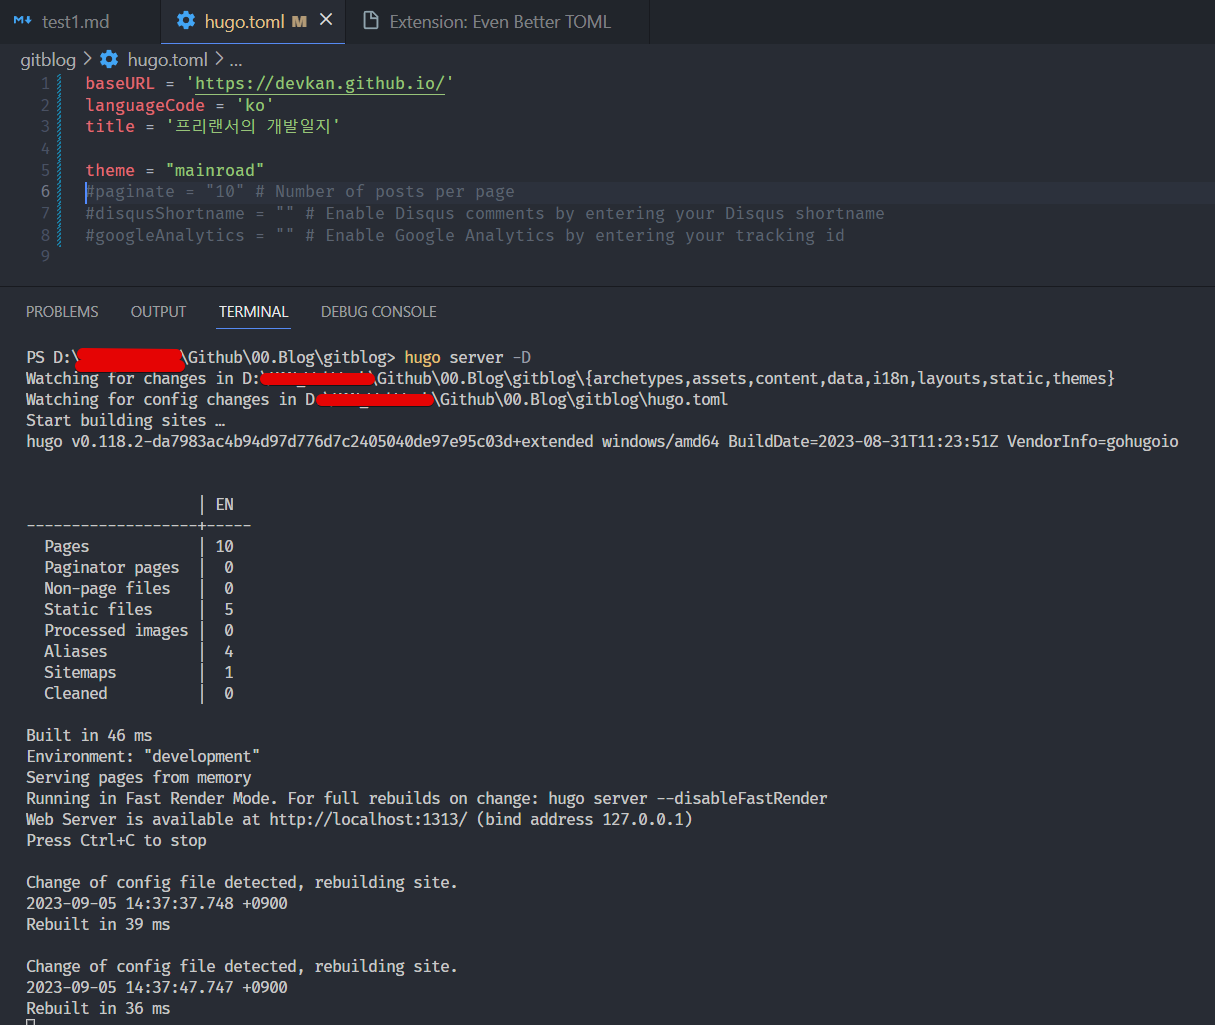
루트 밑에 보면 hugo.toml이 있는데, 이건 hugo에서 사용하는 설정파일입니다.
baseURL = 'https://devkan.github.io/'
languageCode = 'ko'
title = "Senior Developer's Blog"

theme = "mainroad"
이처럼 github 주소와 타이틀, 테마명을 지정해 주고.. 나머지 설정은 config.toml에서 지정해 주면 됩니다.
초기에 실수로 hugo.toml에 그냥 다 지정을 했는데.. 그래도 잘 작동하니 참조하시고요.. ^^;
3. Github 연결하기
이제 블로그를 생성해 보겠습니다.
hugo new site <디렉토리> 로 생성을 하면 블로그 기본 디렉토리가 생성되게 됩니다.
> hugo new site gitblog
Congratulations! Your new Hugo site was created in D:\WebWork\Github\00.Blog\gitblog.

Just a few more steps...

1. Change the current directory to D:\WebWork\Github\00.Blog\gitblog.
2. Create or install a theme:
   - Create a new theme with the command "hugo new theme <THEMENAME>"
   - Install a theme from https://themes.gohugo.io/
3. Edit hugo.toml, setting the "theme" property to the theme name.
4. Create new content with the command "hugo new content <SECTIONNAME>\<FILENAME>.<FORMAT>".
5. Start the embedded web server with the command "hugo server --buildDrafts".

See documentation at https://gohugo.io/.
그리고 git으로 readme.md를 생성해 주고, remote를 추가해 주고 서브모듈도 추가해 줄겁니다.
gitblog> git init
gitblog> echo "# gitblog" >> README.md
gitblog> git add .\README.md
gitblog> git commit -m "first commit"
[master (root-commit) 29deb9a] first commit
1 file changed, 0 insertions(+), 0 deletions(-)
create mode 100644 README.md
gitblog> git branch -M main
gitblog> git remote add origin https://github.com/devkan/gitblog.git
gitblog> git push -u origin main
Enumerating objects: 3, done.
Counting objects: 100% (3/3), done.
Writing objects: 100% (3/3), 230 bytes | 230.00 KiB/s, done.
Total 3 (delta 0), reused 0 (delta 0), pack-reused 0
To https://github.com/devkan/gitblog.git
* [new branch] main -> main
branch 'main' set up to track 'origin/main'.
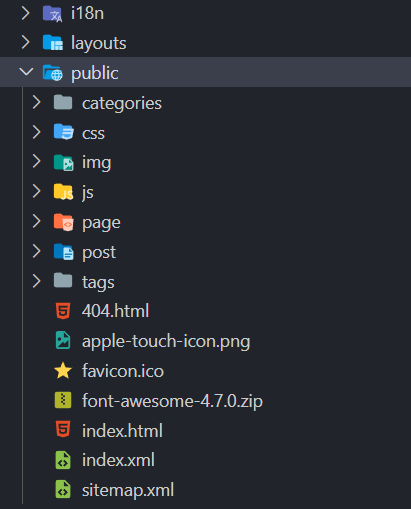
gitblog> git submodule add -b main https://github.com/devkan/devkan.github.io.git public
그럼 public 디렉토리가 생성이 되며, 차후 렌더링을 하면 아래처럼 결과물이 이곳에 위치하게 됩니다.
초기에는 그냥 디렉토리만 생성이 될겁니다.
4. 컨텐츠 생성하기
이제 모든 준비가 되었으니, 컨텐츠를 생성해 보겠습니다.
컨텐츠는 hugo new <section>/<filename>.<format> 으로 생성을 합니다.
gitblog> hugo new post/test.md
Content "D:\\WebWork\\Github\\gitblog\\content\\post\\test.md" created
test.md를 열어서 수정하겠습니다.
+++
title = 'Test'
date = 2023-09-04T19:12:17+09:00
draft = true
+++

11111
draft를 true로 하면, hugo server로 웹서버를 실행했을때 보이지 않습니다.
hugo server -D 로 해야지 웹서버상에 노출됩니다.
글 작성시 우선 true로 하고, 완성되면 false로 바꾸는식으로 하면 됩니다.
hugo로 웹서버를 실행해 보겠습니다.
gitblog> hugo server -D # 웹서버 실행
그리고 http://localhost:1313/ 로 접속해 보면 아래와 같이 보입니다.
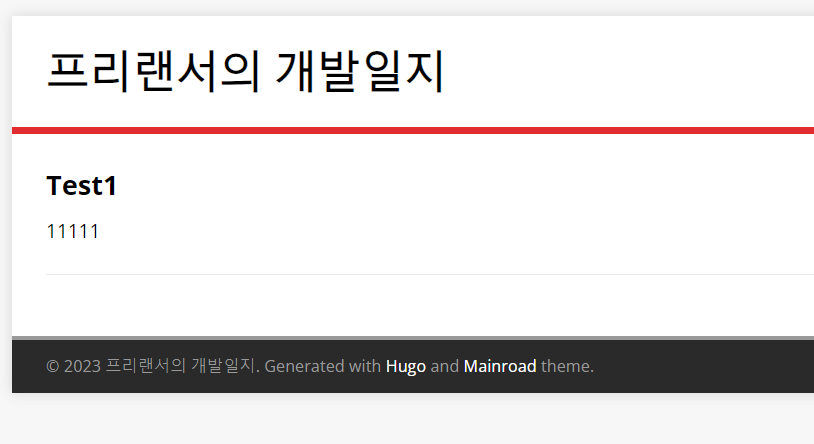
vscode terminal에서 server를 실행하면, 페이지 수정시 바로 결과물을 볼 수 있어 편합니다.
5. Github Pages에 배포하기
실제 github pages에 배포를 해 보겠습니다.
gitblog> hugo -t mainroad # hugo -t <테마명>
gitblog> cd public # public 디렉토리로 이동
gitblog> git add . # 모든 변경 내용을 스테이징(Staging)
gitblog> git commit -m "first build" # commit
gitblog> git push origin main # push

gitblog> cd .. # gitblog 디렉토리로 이동
gitblog> git add . # gitblog 디렉토리로 이동
gitblog> git add . # 모든 변경 내용을 스테이징(Staging)
gitblog> git commit -m "first build" # commit
gitblog> git push origin main # push
정상적으로 되었다면, https://<username>.github.io/ 로 접속하면 test 페이지가 보일겁니다..
그럼 매번 수정후 저 명령어를 입력해야 하느냐.. 아닙니다.
shell script를 만들면 편히 빌드를 시킬수 있습니다.
deploy.sh 내용입니다.
#!/bin/bash
echo -e "\033[0;32mDeploying updates to GitHub...\033[0m"

# hugo -t <테마>
hugo -t mainroad

# Go To Public folder, sub module commit
cd public
# Add changes to git.
git add .

# Commit changes.
msg="rebuilding site `date`"
if [ $# -eq 1 ]
  then msg="$1"
fi
git commit -m "$msg"

# Push source and build repos.
git push origin main

# Come Back up to the Project Root
cd ..

# blog 저장소 Commit & Push
git add .

msg="rebuilding site `date`"
if [ $# -eq 1 ]
  then msg="$1"
fi
git commit -m "$msg"
git push origin main
그리고 터미널에서 실행하면 알아서 빌드가 되고, push가 됩니다.
gitblog> .\deploy.sh
주의 할것은 터미널에서 > deploy.sh로 실행하면 안되고, > .\deploy.sh로 해야 실행이 됩니다.
다음편에서는 댓글 추가와 테마 수정에 대해서 좀더 알아보겠습니다.
끝.